5 Steps to Clean Solar Panels at Home Safely

A layer of dust settles on your rooftop, so thin you barely notice it. Days pass. Then weeks. The dust thickens, joined by a few stray leaves, some bird droppings, and the occasional pollen drift.
Meanwhile, somewhere on your electricity bill, a small but steady leak begins. Dirty solar panels can lose between 15 and 25 percent of their energy output. Left uncleaned for too long, that number can climb to 30 percent by the second year.
The fix is refreshingly simple. You do not need fancy equipment or a professional crew every time. With the right approach, you can clean your solar panels at home, safely and effectively, in just 5 steps.
Before You Begin, A Word on Safety
Before we get into the steps, here is something worth remembering. Solar panels sit on rooftops, often at an angle, sometimes quite high up. Rooftops can be slippery, especially after rain. Panels themselves are made of tempered glass and are not designed to bear your weight.
If your roof is steep, very high, or hard to access safely, this is one of those moments where calling a professional makes sense. Many solar companies offer Annual Maintenance Contracts that handle cleaning along with full system checks. But if your setup is accessible and you feel confident, here is how to do it yourself, the safe way.
Step 1: Turn Off Your Solar System First
Every safe cleaning routine starts the same way, by switching things off. Before touching a single panel, turn off your inverter and shut down the solar system completely. Check your inverter manual for the exact shutdown sequence if you are unsure.
This step might feel unnecessary, especially on a calm, sunny morning. But solar panels generate electricity the moment sunlight hits them. Cleaning a live system means working around live electrical components, and that is not worth the risk. Turning everything off first removes that danger entirely.
Step 2: Choose the Right Time of Day
Timing matters more than most people realize. The best time to clean solar panels is early morning or late evening, when the panels are cool.
Why does this matter so much? Picture pouring cold water onto a hot glass surface. The sudden temperature change can cause tiny cracks, called micro-cracks, that you might not even notice right away but that affect performance over time. Cleaning on a cool, cloudy morning or right after sunrise avoids this risk entirely while also being more comfortable for you.
Step 3: Remove Loose Dust and Debris First
Now comes the gentle part. Before any water touches the panels, clear away loose debris first. Use a soft, dry nylon cloth or a soft-bristle brush to wipe away dust, leaves, and any loose dirt.
This step is often skipped, but it makes a real difference. Removing loose particles first means that when you do add water, you are not grinding gritty dust into the glass surface, which can cause scratches over time. Think of it as dusting before mopping the floor.
Step 4: Wash Gently with Soft Tools and Mild Water
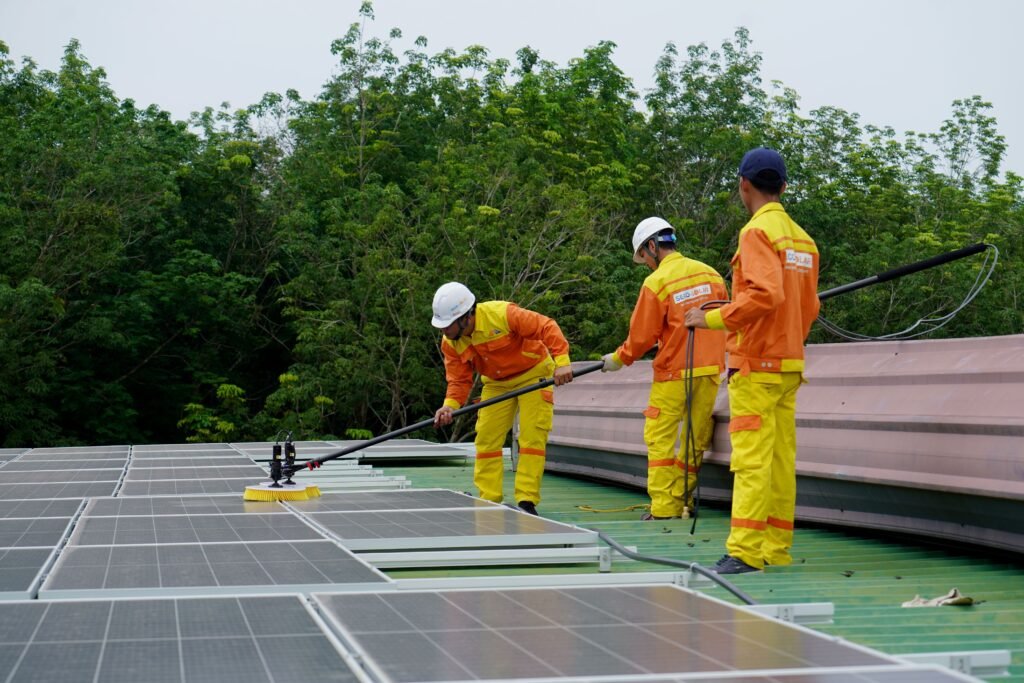
This is the heart of the cleaning process. For stubborn dirt, bird droppings, or sticky residue, use a long-handled soft nylon-bristle brush along with a mild, non-abrasive detergent and low-pressure water.
A few important do’s and don’ts here. Do use RO water or deionized water if possible, since regular hard water can leave white mineral streaks once it dries, a common issue in states like Gujarat and Rajasthan. Do not use a pressure washer. High-pressure jets can force water under the panel frames and damage the seals and electrical connections underneath. And never use harsh chemicals, metal brushes, or abrasive scrubbers, since these can scratch the glass or damage protective coatings.
If you are working from the ground using an extension pole, even better. Staying off the roof entirely is the safest option, and a 12 to 16-foot telescoping pole with a soft brush head can reach most residential rooftop arrays comfortably.
Step 5: Dry and Inspect the Panels
The final step ties everything together. Once you have rinsed the panels, dry them with a soft cloth or a squeegee rather than letting them air dry, especially if you used hard water. This prevents water spots and streaks from forming as the water evaporates.
While drying, take a moment to inspect. Look closely at the frame edges and corners, since dust and bird droppings often accumulate in the frame channels around the panel edges. A quick brush along these areas after washing helps keep the whole system looking and performing its best.
Once everything is dry and looks clean, turn your solar system back on, and you are done.
A Few Golden Rules to Remember
Throughout this process, a handful of simple rules tie everything together. Never walk on the panels, since they are not weight-bearing surfaces and can crack under concentrated pressure. Always wear anti-slip footwear if you are on the roof, since wet panels become slippery quickly. And before attempting any DIY cleaning, check your panel warranty, since some manufacturers have specific cleaning guidelines, and improper cleaning can sometimes void warranty coverage.
How Often Should You Clean?
The general rule of thumb is to clean solar panels at least twice a year. But your specific situation might call for more or less.
If you live in a dusty or polluted city, monthly or fortnightly cleaning works better. In cleaner, less dusty areas, a quarterly clean is often enough. Always clean after a dust storm or a period of heavy bird activity, since these events can quickly cover panels in grime. And do not forget the post-monsoon wash, since even though rain helps, it often leaves behind a thin film of residue that needs a proper clean afterward.
When to Call in the Professionals
DIY cleaning works wonderfully for many homes, but there are moments when calling a professional is the smarter choice. If your roof is high, steep, or difficult to access safely, if you are not confident handling a ladder or extension pole, or if your panels show signs of damage rather than just dirt, it is time to bring in an expert.
Professional cleaning, often bundled into an Annual Maintenance Contract, typically covers not just the panels but also a check of your inverter, wiring, and overall system health. For many homeowners, this combination of safety and thoroughness makes it well worth the cost.
Frequently Asked Questions
Q1: Can I clean my solar panels with just water and no soap?
Yes, for light dust, plain water with a soft brush is often enough. For stubborn dirt, bird droppings, or sticky residue, a mild, non-abrasive detergent helps without damaging the panel surface.
Q2: Is it safe to clean solar panels on a sunny afternoon?
It is best avoided. Cleaning hot panels with cooler water can cause thermal shock, leading to micro-cracks. Early morning or evening, when panels are cool, is the safer choice.
Q3: What if my tap water leaves white marks on the panels?
This usually happens with hard water containing high mineral content. Either dry the panels with a squeegee immediately after washing, or use RO or deionized water for cleaning to avoid these marks altogether.
Q4: How do I know if my panels actually need cleaning?
If your energy monitoring app shows generation dropping below normal levels for your season, or if you can visibly see dust, leaves, or droppings on the panels, it is time for a clean.

My work focuses on finding the human stories behind the headlines, from documenting unique cultural traditions to covering stories from communities across Bengal. Previously, I worked as an SEO Content Writer with Penning Down and Collegedunia, combining digital content expertise with newsroom journalism.
I believe impactful journalism is built on accuracy, empathy, and stories that stay with readers.
- Cocoa Butter Formula, Body Massage Lotion for Stretch Marks - April 9, 2016
- Ultra-calming makeup removing wipes - April 9, 2016
- Eczema therapy hand cream - April 9, 2016
Blog Insights
View All CouponTalk Blogs
12 Best LED Lighting Brands In India

10 Best Water Pump Brands In India
10 Best RO Membrane Brands In India
10 Best Electric Wire Brands In India

10 Best Electric Pressure Cooker Brands In India

10 Best Air Fryer Brands In India