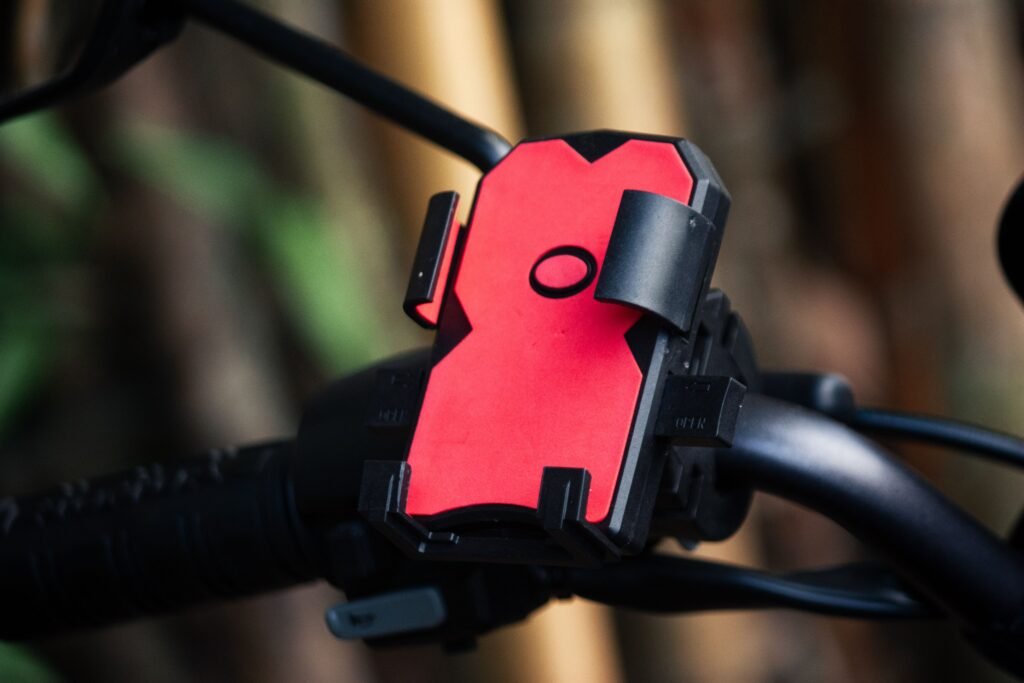
You finally bought a phone mount after weeks of balancing your phone against the speedometer at every red light. You get home, open the box, and realize the instructions are a single folded diagram with no English text and an arrow pointing vaguely at a handlebar that does not look much like yours. Twenty minutes later, the mount is on, but it is crooked, your phone tilts to the left every time you hit a bump, and you are not entirely sure the clamp is actually tight enough to survive a real ride.
Installing a phone mount on an Activa is genuinely simple once you know the two or three details that actually matter. Here is exactly how to do it properly, the first time, without the trial and error.
Before You Start: Know Your Mounting Options
The Activa does not have a single obvious place to mount a phone the way a motorcycle’s wide, exposed handlebar does. Three realistic mounting positions exist, and which one you choose depends on your mount and how you want to glance at your phone while riding.
The handlebar end, where the rubber grip meets the metal bar, is the most common mounting point and the one most universal clamp mounts are designed for. This position keeps the phone closest to your natural forward line of sight.
The rearview mirror stem is the second option, useful if your handlebar ends are too crowded with switches and grips or if you simply prefer the phone slightly off to one side rather than dead center.
The front apron, the plastic panel between your knees below the handlebar, is the third option, used by tray-style mounts that bolt into the apron’s existing screw holes rather than clamping onto a round bar at all. This position is more stable against vibration but requires more of a downward glance while riding.
This guide focuses mainly on the handlebar end installation, since it is what the vast majority of phone mounts sold for the Activa are designed for, with notes on the other two positions where relevant.
What You Will Need
A typical clamp-style phone mount comes with everything needed for installation already included: the clamp base, the phone holder arm, and usually a hex key or Allen wrench sized to fit the clamp’s tightening bolts. Beyond what comes in the box, it helps to have a clean cloth and a small amount of isopropyl alcohol or even just water to wipe down the handlebar surface before fitting anything, since dust and old grime on the bar can prevent the clamp from gripping as firmly as it should.
If your mount uses a separate metal hose clamp-style band rather than a two-bolt clamp, a small flathead screwdriver may be needed instead of or in addition to the hex key.
Step 1: Confirm Your Handlebar Diameter
The Activa’s handlebar, like the vast majority of Indian two-wheelers, uses a standard 22 mm diameter at the grip ends, sometimes referred to as 7/8 inch in product listings that use imperial measurements. This is the most common motorcycle and scooter handlebar size, and the overwhelming majority of clamp mounts sold in India are built around this exact diameter, so in most cases you do not need to measure anything yourself before buying.
If you are installing a mount you already own and are unsure whether it will fit, wrap a strip of paper or tape around the bar at the point where you intend to mount it, mark where the ends overlap, then measure that length and divide by roughly 3.14 to get the diameter. This is a more accurate method than trying to measure across the bar directly with a ruler, since getting the calipers or ruler perfectly aligned across a round surface is harder than it sounds.
Step 2: Choose the Exact Mounting Spot
Before tightening anything, hold the mount loosely in position on the handlebar end and sit on the scooter in your normal riding posture. Look at where the phone holder arm would sit and whether it blocks your view of the speedometer, interferes with your mirror’s reflection, or sits at an angle that strains your neck to glance at while riding.
A common mistake is mounting too close to the very end of the handlebar, where there is less surface area for the clamp to grip firmly and where the mount can interfere with twisting the throttle fully, particularly on the right-hand side. Aim to position the clamp roughly two to three centimeters in from the very end of the grip, giving the clamp jaws a fuller, more secure bite into the bar.
Mark this position lightly with a strip of masking tape or a fine marker before removing the mount so you can return to the exact same spot once you start tightening for real.
Step 3: Clean the Handlebar Surface
Wipe down the marked area with a clean cloth, using a small amount of isopropyl alcohol if you have it, to remove dust, old grease, or residue from the handlebar’s rubber or metal surface. A clean surface lets the clamp’s rubber lining or grip pads make full contact with the bar rather than gripping over a thin layer of grime that can let the mount slowly rotate or slip over weeks of riding.
If your handlebar end has a textured or ridged rubber grip rather than bare metal, most clamps still work fine, but check that the clamp’s inner lining is rubber or silicone rather than bare hard plastic, since hard plastic against a textured rubber grip is more prone to slow slippage under vibration.
Step 4: Position and Hand-Tighten the Clamp
Place the clamp around the handlebar at your marked spot and bring the two halves together, or tighten the hose-clamp-style band, by hand without using the hex key yet. This lets you check the angle and orientation of the mount arm before committing to full tightness, since adjusting a fully torqued clamp later usually means loosening it again from scratch anyway.
With the clamp hand-tight, attach your phone or the empty phone holder cradle and check the viewing angle from your normal seated riding position. Most mount arms have a secondary joint, either a ball joint or a hinge, that lets you adjust the final tilt and rotation of the phone holder independently of the clamp’s position on the bar, so use that joint to fine-tune the angle rather than rotating the entire clamp around the handlebar.
Step 5: Tighten Properly Using the Hex Key
Once you are satisfied with the position and angle, use the supplied hex key to tighten the clamp bolts evenly, alternating slightly between them if there are two or more, rather than fully tightening one side before touching the other. Tightening unevenly can cause the clamp to sit at a slight angle or grip more firmly on one side than the other, which becomes a slow source of wobble over time.
Tighten until the clamp feels genuinely firm and does not shift when you apply moderate hand pressure, but avoid overtightening to the point of straining the plastic threads or visibly deforming a rubber lining, since such actions can damage the clamp mechanism without actually improving the grip. Most clamps reach their effective maximum grip well before reaching the point of damage, so there is rarely a need to apply excessive force.
Step 6: Test for Movement Before Riding
With the clamp fully tightened, grip the mount arm firmly and try to twist, push, and pull it in multiple directions, simulating the kind of jolts it will experience over speed breakers and potholes. There should be no rotation around the handlebar and no looseness in the clamp itself. Some flex in the secondary ball joint or hinge is normal and expected, since that joint is meant to allow angle adjustment, but the clamp’s grip on the bar itself should feel completely solid.
If you notice any rotation or slipping during this test, loosen the clamp, reposition slightly, and retighten rather than riding with a mount that has already shown signs of movement during a stationary test, since vibration on the road will only make any existing looseness worse over time.
Mounting on the Mirror Stem Instead
If you are using a mirror mount rather than a handlebar clamp, the installation is generally simpler since it typically threads directly onto the mirror’s existing mounting bolt rather than clamping around a bar at all. Unscrew the mirror from its stem, thread the mount’s adapter onto the same threaded post, and then reattach the mirror on top of or alongside the adapter depending on your specific mount’s design. Tighten by hand first to check the resulting angle and mirror visibility, then finish tightening with whatever tool the mount specifies, usually a spanner or the mirror’s own retaining nut.
Double-check that your mirror’s visibility has not been meaningfully compromised by the added adapter before riding, since a mirror that has shifted angle slightly during this installation is a genuine safety concern independent of the phone mount itself.
Mounting an Apron Tray
An apron-mounted tray generally uses the existing screw holes already present on the Activa’s front panel rather than requiring you to drill anything new. Remove the existing decorative screw caps or plugs covering these holes, position the tray bracket over them, and secure it using the screws supplied with the tray, which are typically sized to thread directly into the existing mounting points without needing a separate drill or tap.
If your specific tray does not align with the existing holes, do not force new holes into the apron without being certain of what is directly behind that section of plastic, since some sections of the apron sit close to wiring or cable routing. If you are not confident locating new mounting points safely, fitting an apron tray at a mechanic shop avoids this risk for a small labor cost.
After Installation: A Short Settling-In Check
Ride a short, familiar distance, ideally including a couple of speed breakers or rougher patches of road you know well, before relying on the mount for a longer trip. Check the clamp tightness again after this first ride, since a small amount of initial settling is normal as the clamp’s rubber lining compresses slightly under real-world vibration for the first time. If the mount has loosened even slightly after this first ride, retighten it now rather than waiting for it to loosen further on a longer ride later.
It is worth rechecking tightness again after the first week of regular use, and then periodically every few weeks afterward, particularly if your daily route includes consistently rough roads.
Frequently Asked Questions
Q1: Will a phone mount interfere with the Activa’s switches or controls?
If positioned a few centimeters in from the very end of the grip rather than right at the tip, most mounts clear the horn, indicator, and headlight switches without issue. Test by operating every switch through its full range of motion with the mount and phone in place before your first ride to catch any interference while still parked.
Q2: Can I install a phone mount without any tools at all?
Some mounts use a tool-free thumb-screw or lever-lock clamp design specifically for this purpose, trading a small amount of maximum clamping force for installation convenience. A bolted clamp with a proper hex key generally offers better long-term security than a tool-free design, though the latter is suitable for frequent vehicle changes.
Q3: My handlebar has a slight taper near the end. Will a standard clamp still fit properly?
Most Activa handlebars are reasonably straight and consistent in diameter at the grip ends, so this is rarely an issue, but if you do notice a taper, mounting slightly further from the very end, where the diameter is more consistent, generally resolves it. A clamp with a flexible rubber lining also accommodates minor diameter variation better than a rigid hard plastic clamp.
Q4: How do I remove the mount later without damaging the handlebar finish?
Loosen the clamp bolts fully using the same hex key used for installation, then slide or open the clamp away from the bar. If the clamp has been in place for a long time, you may notice a faint outline or slight texture difference on the grip where it sat, which is normal and not a sign of damage and typically fades or becomes unnoticeable within a short period of normal use and weather exposure.
Q5: Should I apply any vibration-damping material during installation?
If your mount does not already include a rubber lining or damping layer, a thin strip of rubber or foam tape applied to the inside of the clamp before fitting it can reduce vibration transfer to your phone and help the clamp grip more securely. This is a worthwhile small addition, particularly if you plan to keep your phone mounted for extended periods, given that sustained vibration can affect a phone’s camera over time.
A properly installed phone mount on an Activa takes less than fifteen minutes once you know where to position it and how to check that it is actually secure rather than just hand-tight. Get the spot right, clean the bar, tighten evenly, and test it before you trust it on the road. It will be where you put it and stay there the next time you need to check directions at a red light.

My work focuses on finding the human stories behind the headlines, from documenting unique cultural traditions to covering stories from communities across Bengal. Previously, I worked as an SEO Content Writer with Penning Down and Collegedunia, combining digital content expertise with newsroom journalism.
I believe impactful journalism is built on accuracy, empathy, and stories that stay with readers.
- Amazon Coupon Code: Up to 70% Off Your Order - October 10, 2024
- Amazon Brand – Solimo 1000ml Stainless Steel Insulated (Thermosteel) Water Bottle | 24 Hours Hot and Cold | Leakproof, Rust and Corrosion Resistant| For Travel, Office, Trekking, Home (Silver) - October 9, 2024
- Panasonic Portable Oral Irrigator/Dental Water Flosser - April 10, 2016
Blog Insights
View All CouponTalk Blogs
12 Best LED Lighting Brands In India

10 Best Water Pump Brands In India
10 Best RO Membrane Brands In India

10 Best Electric Wire Brands In India

10 Best Electric Pressure Cooker Brands In India
Best Waterproof Phone Mount for Bike India
Best Phone Mount for Pulsar 150, 220, and NS200
Best Phone Mount for Royal Enfield Classic 350
Best Bike Phone Mount for Activa 6G: Top Picks Compared

7 Best Bike Engine Oil Brands In India